Your First Script
Let’s create a simple “Hello, World!” script that will be compiled to scrHello.gml. Here’s what we’re going to do:
- Create a new GML script in
src/hello.ss. - Write our “Hello, World!” code in it.
- Import the
hellomodule tosrc/index.ss. - Run
bun run generate|npm run generate|pnpm generateto compile it. - Open the compiled
.out/scripts/scrHello/scrHello.gmlto see the result.
Project Structure
Section titled “Project Structure”We’ll use the inline project structure for this example. Your project should look like this:
Directoryyour-gamemaker-project // your GameMaker project folder
- …
Directoryscripts/
- …
Directorysrc/ // directory we’re going to use for ScaffScript
- hello.ss
- index.ss
- package.json
- scaff.config.*
- your-gamemaker-project.yyp
Generating GML Code
Section titled “Generating GML Code”-
Edit the
Section titled “Edit the generate script in package.json”generatescript inpackage.jsonEdit the
generatescript inpackage.jsonto target the correct GameMaker project path.package.json {// --- snip ---"scripts": {"generate": "scaff gen ./my-game.yyp","generate": "scaff gen ./your-gamemaker-project.yyp","help": "scaff help","scaff": "scaff"},// --- snip ---}The
your-gamemaker-project.yypshould be the path to your GameMaker project file. For example, if your GameMaker project file is located at./path/to/your/project/your-gamemaker-project.yyp, then the script should look like this:{// --- snip ---"scripts": {"generate": "scaff gen ./path/to/your/project/your-gamemaker-project.yyp","help": "scaff help","scaff": "scaff"},// --- snip ---} -
Create
Section titled “Create hello Module”helloModuleLet’s consider
hello.ssas a module that exports a variable and a function. Basically, it’s like a self-contained unit of code that you canimportand use in other files.src/hello.ss export var message = "Hello, World!";export function print_message() {show_debug_message(message);}What’s Happening?
Section titled “What’s Happening?”exportkeyword makes the variable/function available outside of the module, so that you can import it in other files.varkeyword declares a variable. For thevarkeyword, it’s the same asvarin GML.functionkeyword declares a function. It’s the same asfunctionin a script asset in GML.- So,
messagevariable andprint_messagefunction are both exported from thehellomodule, which can be imported in other files.
If we create a tree structure to represent the code above, it would look like this:
hello├── var message = "Hello, World!";└── function print_message() {show_debug_message(message);}That’s your first module! Now, let’s import it in
index.ssand see how it works. -
Create
Section titled “Create index.ss as an Integration Point”index.ssas an Integration PointCreate a new file named
index.ssin thesrc/directory. This file will serve as the entry point for our project.In this step, you can choose to either use
importstatement orincludestatement to import thehellomodule. But in reality, you would use both statements in different scenarios. For now, let’s see how to useimportstatement first.Style 1: Using
Section titled “Style 1: Using import Statement”importStatementimportstatement is a general purpose statement to import modules. It’s used to import modules from other files, then you can use the imported modules with content directives.src/index.ss import { print_message } from "./hello"@content print_messageprint_message();What’s Happening?
Section titled “What’s Happening?”importkeyword imports theprint_messagefunction from thehellomodule.@contentdirective inlines the full compiled GML declaration of theprint_messagefunction at the current position.print_message()calls theprint_messagefunction.- So, the
indexmodule imports theprint_messagefunction from thehellomodule, then calls it.
The
index.sswill look like this after compilation:src/index.ss import { print_message } from "./hello"@content print_messagefunction print_message() {show_debug_message(message);}print_message();How about the
Section titled “How about the message variable?”messagevariable?The example above only imports the
print_messagefunction, so themessagevariable is not imported. But of course, you can import it by addingmessageto theimportstatement.src/index.ss import { print_message, message } from "./hello"@content print_messageprint_message();It won’t affect the result, because we don’t use any content directives on the
messagevariable. Let’s edit the code a bit to see how it works.src/index.ss import { print_message, message } from "./hello"@content print_messageprint_message();show_debug_message(@valueof message);The
index.sswill look like this after compilation:src/index.ss import { print_message, message } from "./hello"@content print_messageshow_debug_message(@valueof message);function print_message() {show_debug_message(message);}show_debug_message("Hello, World!");@valueofdirective inlines the raw value of themessagevariable at the current position.- So, the
show_debug_message(@valueof message);line is compiled toshow_debug_message("Hello, World!");.
Style 2: Using
Section titled “Style 2: Using include Statement”includeStatementincludestatement is short hand forimportstatement +@contentdirective. It’s used to inline the compiled content of a module at the point of the statement. See the difference betweenimportandincludefor more information.Let’s see how to use
includestatement to import thehellomodule.src/index.ss include { print_message } from "./hello"print_message();The
index.sswill look like this after compilation:src/index.ss include { print_message } from "./hello"function print_message() {show_debug_message(message);}print_message();What’s Happening?
Section titled “What’s Happening?”includestatement inlines the compiled content of theprint_messagefunction at the point of the statement.print_message()calls theprint_messagefunction.
Inlining Multiple Exports in a Single
Section titled “Inlining Multiple Exports in a Single include Statement”includeStatementYou can inline multiple exports in a single
includestatement. For example:src/index.ss include { message, print_message } from "./hello"show_debug_message(message);The
index.sswill look like this after compilation:src/index.ss include { print_message, message } from "./hello"var message = "Hello, World!";function print_message() {show_debug_message(message);}show_debug_message(message); -
Add Integration Block and
Section titled “Add Integration Block and intg Statement”intgStatementWe’re not done yet with
index.ss. We need to add an integration block andintgstatement, so ScaffScript can integrate the compiled content to a specific asset.Let’s add an integration block and
intgstatement toindex.ss. We’ll use theimportstatement and@contentdirective in this example.src/index.ss intg { main } to "./scripts/scrHello"import { message, print_message } from "./hello"#[main]@content print_messageprint_message();show_debug_message($"message is {@valueof message}");It will generate
./.out/scripts/scrHello/scrHello.gmlthat contains the compiled content of themainintegration block../.out/scripts/scrHello/scrHello.gml function print_message() {show_debug_message(message);}print_message();show_debug_message("message is Hello, World!");What’s Happening?
Section titled “What’s Happening?”intg { main } to "./scripts/scrHello"statement maps themainintegration block to thescrHelloscript asset.#[main]integration block defines the content that will be generated and integrated to thescrHelloscript asset.
-
Run the
Section titled “Run the generate Script”generateScriptOpen your terminal in your project root directory, and run the
generatescript to compile theindex.ssand generate thescrHello.gmlfile.Terminal window bun run generateTerminal window npm run generateTerminal window pnpm run generate
Congrats! You’ve just created your first ScaffScript script. You can check the generated GML code in the .out/ directory.
Optional: Integrating to GameMaker Project
Section titled “Optional: Integrating to GameMaker Project”In ScaffScript, we have a feature to integrate the generated GML to your GameMaker project. It’s called GM Integration. You can activate it by setting noIntegration: false in scaff.config.cjs|ts.
module.exports = { clearOutputDir: false, noIntegration: true, noIntegration: false, production: false, source: "./src", tabType: "1t", targetPlatform: "all", useGmAssetPath: true // other options...};export default { clearOutputDir: false, noIntegration: true, noIntegration: false, production: false, source: "./src", tabType: "1t", targetPlatform: "all", useGmAssetPath: true // other options...} satisfies Partial<ScaffConfig>;-
Run CLI Command to Compile and Integrate
Section titled “Run CLI Command to Compile and Integrate”Open your terminal in your project root directory, and run the script with your package manager:
Terminal window bun run generateTerminal window npm run generateTerminal window pnpm generate -
Reload Changes in GameMaker IDE
Section titled “Reload Changes in GameMaker IDE”Open your GameMaker project, and you should see a window similar to this:
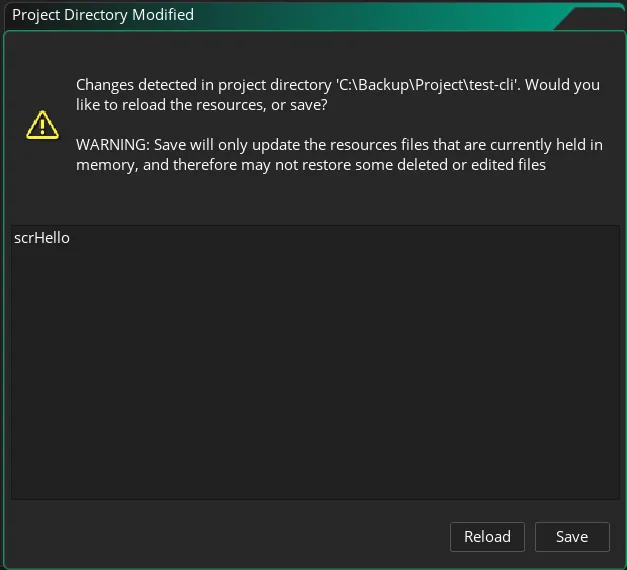
Click the Reload button to reload the changes. After that, you should see the
scrHelloscript asset in the GameMaker IDE. -
Review the Compiled GML Code
Section titled “Review the Compiled GML Code”Open the
scrHelloscript asset in the GameMaker IDE, and you should see the compiled GML code.scrHello.gml function print_message() {show_debug_message(message);}print_message();show_debug_message("message is Hello, World!");In the terminal, ScaffScript waiting your input whether to accept or revert the changes. Type
yto accept the changes, ornto revert the changes.Terminal window [INPUT] Revert file scrHello.gml from scripts/scrHello? (y/N) ->Enter
yto revert the changes, or just pressEnterto accept the changes.
That’s how you integrate ScaffScript to your GameMaker project. You can check out the GameMaker Workflow for more information.