GameMaker Workflow
In this section, we will cover how ScaffScript fits into your GameMaker project lifecycle.
Setting Up scaff.config.*
Section titled “Setting Up scaff.config.*”The scaff.config.cjs (from pnpm or npm) or scaff.config.ts (from bun) file is the main configuration file for ScaffScript. It contains all the settings for your project. This config is created automatically when you run bun|pnpm|npm create @scaffscript/project@latest.
Here’s minimal config you can use:
module.exports = { clearOutputDir: false, noIntegration: false, path: { // path aliases... }, production: false, tabType: "1t", targetPlatform: "all", useGmAssetPath: true, // other options...};export default { clearOutputDir: false, noIntegration: false, path: { // path aliases... }, production: false, tabType: "1t", targetPlatform: "all", useGmAssetPath: true, // other options...} satisfies Partial<ScaffConfig>;intg Workflow
Section titled “intg Workflow”We’ll use this structure for this example:
Directorysrc/
Directoryfs/
- control.ss
- input.ss
- output.ss
Directoryutils/
- debug.ss
- math.ss
- index.ss
Create ScaffScript Source Files
Section titled “Create ScaffScript Source Files”Let’s say we’ve code each module in fs and utils directory, and we want to use them in index.ss.
-
Create the main logic first in the
Section titled “Create the main logic first in the index.ss”index.sssrc/index.ss import { log } from "./utils/debug"include { read_file } from "./fs/input"include { append_file } from "./fs/output"@content logvar data = read_file("data.txt");log(data);append_file("data.txt", "Hello, World!");This code will read the
data.txtfile, log the content, then append the text “Hello, World!” to thedata.txtfile. -
Add the
Section titled “Add the intg statement to index.ss”intgstatement toindex.sssrc/index.ss intg { main } to "./scripts/Test/scrHello"import { log } from "./utils/debug"#[main]include { read_file } from "./fs/input"include { append_file } from "./fs/output"@content logvar data = read_file("data.txt");log(data);append_file("data.txt", "Hello, World!");Explanation
Section titled “Explanation”#[main]integration block defines the content that will be generated when themainblock is included in theintgstatement.intg { main } to "./scripts/Test/scrHello"statement maps themainintegration block to thescrHelloscript asset underTestfolder.importstatement is moved outside of the#[main]block, because we need to import thelogfunction before themainblock is executed.Testin theintgstatement is a virtual path. It will be created as a group/folder in the GameMaker IDE. Read more about virtual path in the Code Generation page.
Result
Section titled “Result”function read_file(file_path) { // implementation...}function append_file(file_path, text) { // implementation...}function log(message) { // implementation...}
var data = read_file("data.txt");log(data);
append_file("data.txt", "Hello, World!");Integrate to GameMaker Project
Section titled “Integrate to GameMaker Project”We’ll integrate it to scrHello script asset.
-
Run
Section titled “Run bun|pnpm|npm run generate to compile and integrate”bun|pnpm|npm run generateto compile and integrateTerminal window bun run generateTerminal window npm run generateTerminal window pnpm run generateIt will generate the
scrHello.gmlfile in the.out/directory, then integrate it to thescrHelloscript asset in the GameMaker project. -
Apply changes in GameMaker IDE
Section titled “Apply changes in GameMaker IDE”Open your GameMaker project, and you should see a window like this:
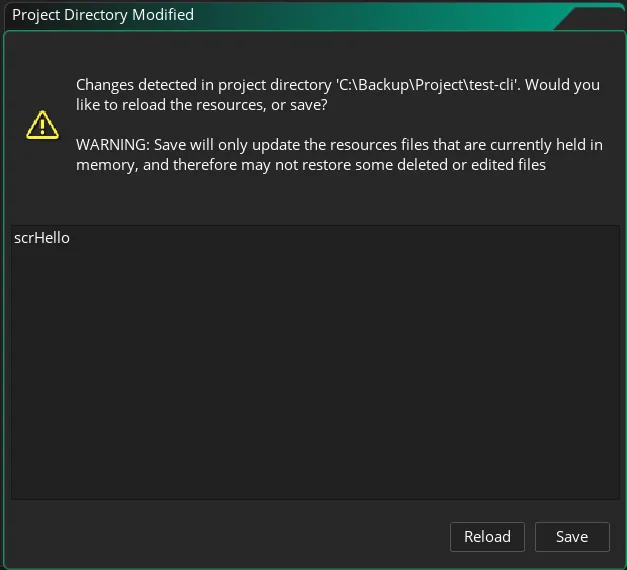
Click the Reload button to reload the changes. Then, open the
scrHelloscript asset in the GameMaker IDE, and you should see the compiled GML code. -
Review the integration result
Section titled “Review the integration result”Check your terminal, it should waiting for your input to accept or revert the changes.
Terminal window [INPUT] Revert file scrHello.gml from scripts/Test/scrHello? (y/N) ->Type
yto revert the changes, or just pressEnterto accept the changes.
That’s the basic workflow of using ScaffScript in your GameMaker project.
Reload Changes in GameMaker IDE
Section titled “Reload Changes in GameMaker IDE”If you let ScaffScript to create the asset for you, you might won’t see the asset in the GameMaker IDE immediately. You need to re-open the project to see the created asset.
Why this is happening?
Section titled “Why this is happening?”ScaffScript creates the asset in the .yyp file. If you see your GameMaker project name in the reload window, it means the GameMaker IDE is aware of the changes in the .yyp file. But, if you don’t, you need to re-open the project to see the created asset.
Solutions
Section titled “Solutions”There are 2 solutions for this problem:
- Add the asset manually in the GameMaker IDE before running the
generatecommand Recommended. - Re-open the GameMaker project.
Writing to Object Events
Section titled “Writing to Object Events”Back then in ScaffScript initial design, we can’t write to object events directly, not even any workaround. But we realize, it’s kind of “weird” that we can’t write to object events, even though we can write to script assets. So, we added a way to write to object events. Here’s how it works:
- The last segment of the
pathin theintgstatement is the object asset name. - The segment must include
objects/in thepathto be recognized as an object asset. - The integration block must have an event targeting. For example:
#[create as create],#[show_info as keydown:keyboard_f1], etc. - Integration blocks with no event won’t be written to the object asset.
- ScaffScript will create the necessary event files for you.
Example
Section titled “Example”intg { create, show_info, keypress:keyboard_space, no_event } to "./objects/Test/objController"
#[create as create]show_debug_message("create event!");
#[show_info as keydown:keyboard_f1]show_debug_message("F1 pressed!");
#[keypress:keyboard_space Event]show_debug_message("Space pressed!");
#[no_event]show_debug_message("This won't be shown");And then, run bun|pnpm|npm run generate to compile and integrate.
Explanation
Section titled “Explanation”intg { create, show_info, keypress:keyboard_space, no_event } to "./objects/Test/objController"statement maps thecreate,show_info,keypress:keyboard_space, andno_eventintegration blocks to theobjControllerobject asset underTestfolder.#[create as create]integration block targets thecreateevent of theobjControllerobject asset.#[show_info as keydown:keyboard_f1]integration block targets thekeydown:keyboard_f1event of theobjControllerobject asset.#[keypress:keyboard_space Event]integration block targets thekeypress:keyboard_spaceevent of theobjControllerobject asset.#[no_event]integration block has no event targeting, so it won’t be written to theobjControllerobject asset.- You can fill the content inside each integration block as you would normally do in a script asset.
- For safety purpose, you should create the
objControllerobject asset in the GameMaker IDE first, and create the necessary events before running thegeneratecommand.
Result
Section titled “Result”Directory.out/
Directoryobjects/
DirectoryTest/
DirectoryobjController/
- Create_0.gml
- Keyboard_32.gml
- Keyboard_112.gml
- objController.gml // for the non-event integration block
show_debug_message("create event!");show_debug_message("Space pressed!");show_debug_message("F1 pressed!");dev vs prod Flags
Section titled “dev vs prod Flags”ScaffScript has a feature to filter out integration blocks based on the dev or prod flags. This is useful when you want to have different behavior in development1 and production2 stage. Here’s how it works:
- Content inside
#[main -- dev]or#[main -- development]will be removed whenproduction: truein thescaff.config.cjs|ts. - Content inside
#[main -- prod]or#[main -- production]will be removed whenproduction: falsein thescaff.config.cjs|ts. - You can have multiple
devandprodblocks in a single file, even with the same block name.
Example 1
Section titled “Example 1”intg { main } to "./scripts/Test/scrHello"
#[main -- dev]show_debug_message("Only in development!");
#[main -- prod]show_debug_message("Only in production!");Result 1
Section titled “Result 1”production: false in scaff.config.cjs|ts:
show_debug_message("Only in development!");production: true in scaff.config.cjs|ts:
show_debug_message("Only in production!");It’s a simple yet powerful feature that can help you to test your code in different stages. Here’s other example of how you can use it:
Example 2
Section titled “Example 2”intg { main } to "./scripts/Test/scrHello"
import { log } from "./utils/debug"
#[main]include { read_file } from "./fs/input"include { append_file } from "./fs/output"@content log
#[main -- dev]var data = undefined;
try { data = read_file("data.txt"); log(data); show_debug_message("Data read successfully!");}catch (err) { show_debug_message("Error reading data: " + err);}
try { append_file("data.txt", "Hello, World!"); show_debug_message("Data written successfully!");}catch (err) { show_debug_message("Error writing data: " + err);}
#[main -- prod]var data = read_file("data.txt");log(data);
append_file("data.txt", "Hello, World!");Explanation
Section titled “Explanation”#[main]block will be included in both development and production stage.#[main -- dev]block is used for testing theread_fileandappend_filefunctions in development stage. It will be removed in production stage.#[main -- prod]block is used for the actual logic of the script. It won’t be included in development stage.- After testing phase in development stage is done, you can be sure that the
read_fileandappend_filefunctions are working as expected, so you can remove theprodflag in the thirdmainintegration block, and safely use them in production stage.- Why removing the
prodflag instead of removing the#[main -- dev]block? Because you might need to re-test the functions again in the future, and you don’t want to re-write the test code every time. - And in case you need to test it again, you can just add the
prodflag back to the thirdmainintegration block, and re-run thegeneratecommand.
- Why removing the
Result 2
Section titled “Result 2”production: false in scaff.config.cjs|ts:
function read_file(file_path) { // implementation...}function append_file(file_path, text) { // implementation...}function log(message) { // implementation...}
var data = undefined;
try { data = read_file("data.txt"); log(data); show_debug_message("Data read successfully!");}catch (err) { show_debug_message("Error reading data: " + err);}
try { append_file("data.txt", "Hello, World!"); show_debug_message("Data written successfully!");}catch (err) { show_debug_message("Error writing data: " + err);}production: true in scaff.config.cjs|ts:
function read_file(file_path) {    // implementation...}function append_file(file_path, text) {    // implementation...}function log(message) {    // implementation...}
var data = read_file("data.txt");log(data);
append_file("data.txt", "Hello, World!");Platform Specific Code
Section titled “Platform Specific Code”ScaffScript also has a feature to write platform specific code. This is useful when you want to have different behavior in different platforms. Here’s how it works:
- Content inside
#[main -- <platform>]will be included only whentargetPlatform: "<platform>"in thescaff.config.cjs|ts. - Content inside
#[main -- !<platform>]will be included only whentargetPlatformis not set to"<platform>"in thescaff.config.cjs|ts. - You can have multiple platform flags in a single block, even with the same block name.
Example
Section titled “Example”#[main]show_debug_message("On all platforms!");
#[main -- windows]show_debug_message("Windows only extra content!");
#[htmlBlock -- !html5]show_debug_message("Anything but HTML5!");
#[htmlBlock -- html5]show_debug_message("This is from HTML5!");Result
Section titled “Result”Let’s test it with configuring the targetPlatform to windows, android, and html5 in the scaff.config.cjs|ts.
targetPlatform: "windows" in scaff.config.cjs|ts:
#[main]show_debug_message("On all platforms!"); show_debug_message("Windows only extra content!");
#[htmlBlock] show_debug_message("Anything but HTML5!");
targetPlatform: "android" in scaff.config.cjs|ts:
#[main]show_debug_message("On all platforms!");
#[htmlBlock] show_debug_message("Anything but HTML5!");
targetPlatform: "html5" in scaff.config.cjs|ts:
#[main]show_debug_message("On all platforms!");
#[htmlBlock] show_debug_message("This is from HTML5!");Review Step
Section titled “Review Step”By default, after you run the generate command, ScaffScript will prompt you to review the changes, whether to accept or revert the changes.
For existing files (backup available)
Section titled “For existing files (backup available)”[INPUT] Revert file <filename> from <path>? (y/N) ->Type y to restore the original content. Otherwise, the new content will be kept.
For new files (no backup)
Section titled “For new files (no backup)”[INPUT] Remove file <filename> from <path>? (y/N) ->Type y to delete the file and remove it from the .yyp. Otherwise, the file will be kept.
Development Loop
Section titled “Development Loop”Here’s the TL;DR of the development loop using ScaffScript:
- Create your logic in
.ssfiles. - Add integration blocks (
#[...]) andintgstatement to one or more.ssfiles (index.ssis preferred).- Optional: Create the target asset in the GameMaker IDE based on the last segment of the
intgpath. For example, if yourintgstatement isintg { main } to "./scripts/scrHelloWorld", create ascrHelloWorldscript asset in the GameMaker IDE.
- Optional: Create the target asset in the GameMaker IDE based on the last segment of the
- Run
bun|pnpm|npm run generateto compile it.- Make sure you’ve set the correct GameMaker project path in the
package.jsonscripts. - Recommended: Review the compiled GML code in the
.out/directory.
- Make sure you’ve set the correct GameMaker project path in the
- Apply changes in GameMaker IDE by clicking the Reload button.
- Choose whether to accept or revert the changes for each file when prompted.
- Repeat!
Footnotes
Section titled “Footnotes”-
Development: In ScaffScript context, it means a condition where your ScaffScript project isn’t ready to be published yet. In integration block context, it means the content inside the block is only relevant in development stage, and should be removed in production stage. ↩
-
Production: The opposite of development. ↩